In the world of automotive emergencies, few things are as frustrating as discovering your spare tire is unusable just when you need it most. Whether you’re dealing with a flat tire on a deserted highway or preparing for a long road trip, checking your spare tire’s pressure is a non-negotiable step before attempting a swap. This overlooked task can mean the difference between a quick fix and a prolonged roadside ordeal. In this comprehensive guide, we’ll explore why checking spare tire pressure matters, the tools you’ll need, a detailed step-by-step process, safety considerations, and tips to keep your spare ready for action. By the end, you’ll be equipped to handle this crucial maintenance task confidently.
Why Checking Spare Tire Pressure Is Crucial
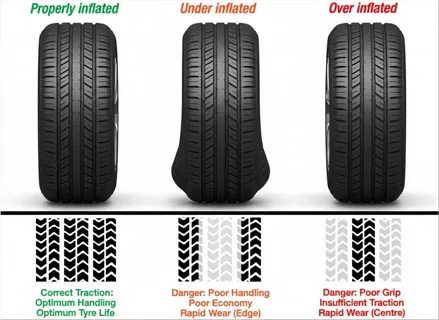
Spare tires are your vehicle’s safety net, designed to get you to a repair shop when a regular tire fails. However, they often sit unused for months or years, leading to gradual air loss. According to tire experts, tires can lose 1-2 PSI (pounds per square inch) per month due to natural permeation through the rubber. An underinflated spare can compromise handling, increase rolling resistance, and even lead to a blowout if driven at speed. On the flip side, overinflation can cause uneven wear, reduced traction, and potential sidewall damage.
For temporary “donut” spares—those compact, lightweight options—proper pressure is even more critical. These are engineered for short distances (typically 50-70 miles at speeds under 50 mph) and can fail catastrophically if underinflated. Imagine swapping to a flat spare only to realize it’s unusable; that’s a recipe for danger. Checking pressure ensures your spare meets the manufacturer’s recommended PSI, usually 30-35 PSI for most passenger vehicles, as outlined in your owner’s manual or on the driver’s side door jamb sticker.
Beyond safety, regular checks prevent costly surprises. A study by the National Highway Traffic Safety Administration (NHTSA) highlights that improper tire pressure contributes to thousands of accidents annually. By incorporating this into your routine, you not only extend the spare’s lifespan but also avoid the embarrassment of a failed roadside change. Think of it as preventive maintenance: a few minutes now could save hours later.
Tools and Preparation for Checking Pressure
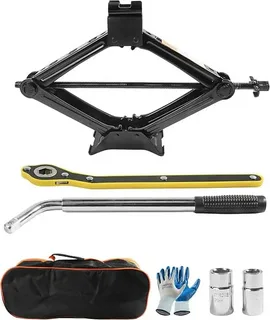
Before diving in, gather the right tools to make the process efficient and accurate. You don’t need a full garage setup—just a few essentials that fit in your glovebox or emergency kit.
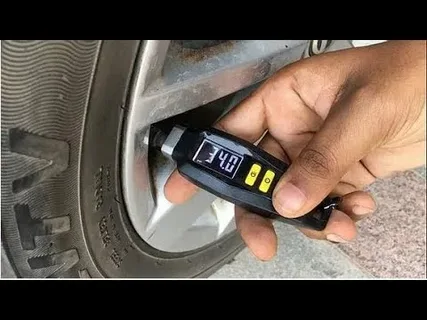
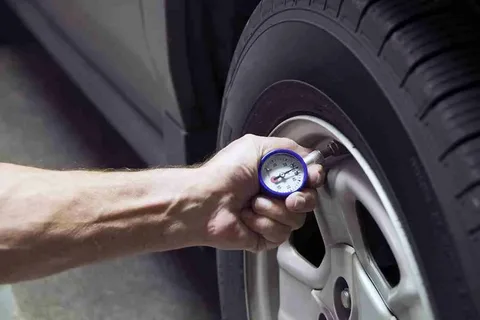
- Tire Pressure Gauge: This is the star of the show. Opt for a digital gauge for ease (they’re accurate and often backlit), or a traditional analog pen-style gauge. Smartphone apps with adapters exist, but a dedicated gauge is more reliable. If your car lacks one, purchase an inexpensive one— they’re widely available at auto stores for under $10.
- Air Compressor (Optional but Recommended): A portable compressor can inflate the tire on the spot. Battery-powered models are compact and useful for emergencies. If you’re at a gas station, use their air pump.
- Flashlight: Essential for checking in low-light conditions, like at night or in a dimly lit trunk.
- Gloves: Protect your hands from dirt, grime, or cold metal.
- Valve Stem Cap Key or Pliers: If the cap is stuck, these can help remove it without damage.
- Notebook or App: To record readings for future reference.
Prepare by parking on level ground and engaging the parking brake. If the spare is mounted under the vehicle, ensure stability to avoid accidents. Always work in a safe, well-lit area away from traffic.

Step-by-Step Guide to Checking Spare Tire Pressure
Follow these steps meticulously for accurate results. The process takes just 5-10 minutes but can prevent major headaches.
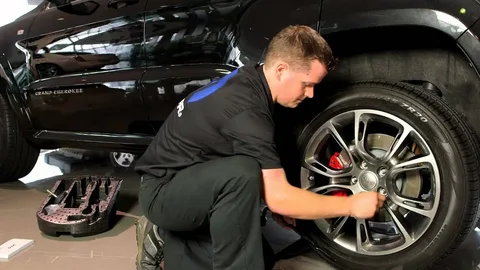
- Locate and Access the Spare Tire: Open your trunk, lift the floor mat, or access the under-vehicle compartment. Spares are often secured with bolts or straps—use the lug wrench from your kit to loosen them if needed. For under-mounted spares, crawl under carefully or use a mirror to inspect. Remove any covers or tools obstructing access.
- Perform a Visual Inspection: Before measuring, give the tire a quick once-over. Look for signs of damage: cracks in the sidewall, bulges, punctures, or excessive wear. Check the tread depth—spares should have at least 2/32 inch remaining. If the tire shows any issues, do not use it. Instead, call roadside assistance for a replacement. This step alone can save you from a dangerous situation.
- Remove the Valve Cap: Locate the valve stem, a small metal or rubber protrusion on the wheel’s inner edge. Unscrew the plastic or metal cap counterclockwise. Place it in a safe spot to avoid losing it—caps are cheap but annoying to replace. If it’s corroded, use pliers gently to avoid stripping the threads.
- Attach the Gauge and Measure: Press the gauge firmly onto the valve stem. For digital gauges, it will display the reading instantly, often with a beep. Analog gauges require you to listen for a brief air hiss and then read the dial. Hold it steady for 5-10 seconds to ensure accuracy. Note the PSI value displayed. If the gauge doesn’t register, try again or check for a faulty valve stem.
- Interpret the Reading: Compare the measured PSI to your vehicle’s recommended pressure. This is typically 30-35 PSI for standard tires, but consult your manual for specifics (e.g., SUVs might require 40-45 PSI). A variance of 5 PSI is generally acceptable, but aim for exactness. If it’s low, proceed to inflation; if high, you’ll need to release air.
- Adjust Pressure if Necessary:
- Inflating a Low-Pressure Tire: Connect a portable compressor to the valve stem. Inflate in short bursts (10-15 seconds), pausing to re-check with the gauge. Avoid overinflating—stop when you reach the target PSI. If using a gas station pump, pay attention to the meter and add air gradually.
- Deflating an Overinflated Tire: Press the center pin of the valve stem with the gauge’s release tool or a small screwdriver. Let air escape slowly while monitoring the gauge. Re-check frequently to prevent underinflation.
- Special Note for TPMS: If your vehicle has Tire Pressure Monitoring System (TPMS) sensors, the spare might have one too. Inflating could trigger a warning light—reset it via your dashboard if needed.
- Replace the Valve Cap and Secure Everything: Screw the cap back on tightly. Reinstall any straps or covers on the spare. Wipe away dirt for cleanliness.
- Final Re-Check: After adjustments, wait 5-10 minutes and measure again. Temperature affects pressure (it rises with heat), so if you’ve been driving, let the tire cool first for the most accurate reading.
Safety Tips and Best Practices
Safety should always come first. Checking tire pressure seems straightforward, but mishaps can occur, especially with under-vehicle spares.
- Stability First: Never check pressure while the car is moving. If the spare is under the vehicle, chock the wheels and use jack stands if lifting is involved (though not necessary here).
- Weather and Conditions: Avoid checking in extreme cold or rain, as it can affect gauge accuracy. Wear reflective gear if working at night.
- Electrical Safety: If using a battery-powered compressor, ensure connections are secure to prevent sparks.
- Hygiene and Health: Gloves prevent cuts from sharp edges. If you have allergies, be mindful of dust.
- Frequency of Checks: Inspect monthly or before long trips. Mark your calendar or set a phone reminder.
- When to Call Professionals: If the spare is damaged or pressure can’t be adjusted, don’t attempt a change. Use roadside services like AAA or a tow truck.
Common Mistakes and How to Avoid Them
Even seasoned drivers err. Here are pitfalls to sidestep:
- Skipping the Visual Check: Assuming the tire is fine without inspection can lead to using a compromised spare.
- Using an Inaccurate Gauge: Cheap or faulty gauges give wrong readings. Calibrate yours periodically.
- Over- or Under-Adjusting: Rushing inflation can cause bursts or poor performance. Take it slow.
- Ignoring Temperature Effects: Checking hot tires post-drive inflates readings artificially.
- Losing the Valve Cap: Keep it in your pocket during the process.
- Forgetting to Re-Check: Always verify after adjustments.
By avoiding these, you’ll maintain accuracy and safety.
Additional Advice for Tire Maintenance
Checking spare pressure is part of broader tire care. Rotate tires every 5,000-8,000 miles, align them annually, and inspect for balance. Invest in a quality emergency kit including a gauge, compressor, and sealant for minor punctures. If your spare is a full-size match, it can be driven longer, but always replace it after use.
In regions with harsh climates, like freezing winters, pressure checks become vital as cold air contracts, dropping PSI. Apps like “Tire Pressure” can log readings for trends.
Conclusion: Empower Yourself with Knowledge
Checking spare tire pressure is a simple yet powerful habit that enhances road safety and preparedness. By following this guide, you’ll avoid the pitfalls of an unusable spare and handle emergencies with ease. Remember, a well-maintained spare is peace of mind on wheels. Incorporate this into your routine, and you’ll drive with confidence knowing you’re ready for whatever the road throws at you. Stay safe, and happy motoring!
Leave a Reply